Diagnostic Test
- CHECK FOR AN INTERMITTENT CONDITION
- Turn the ignition on and open one of the front doors.NOTE:
A front door must remain open whenever checking or erasing Amplifier DTCs.
- Using the scan tool, record and erase the Amplifier DTCs.
- Cycle the ignition switch from on to off, wait five seconds and then back to on.
- Turn the Radio on and set the volume to 25.
- Adjust the speakers to the rear and center.
- Using the scan tool, read the active Amplifier DTCs.
Does the scan tool display: B1481-CHANNEL 7 AUDIO SPEAKER OUTPUT CIRCUIT OPEN?
Yes
- Go To 2
No
- Test complete, the condition or conditions that originally set this DTC are not present at this time. Using the wiring diagrams as a guide, check all related splices and connectors for signs of water intrusion, corrosion, pushed out or bent terminals and correct pin tension.
- Perform the BODY VERIFICATION TEST. Refer to STANDARD PROCEDURE - BODY VERIFICATION TEST .
- Turn the ignition on and open one of the front doors.
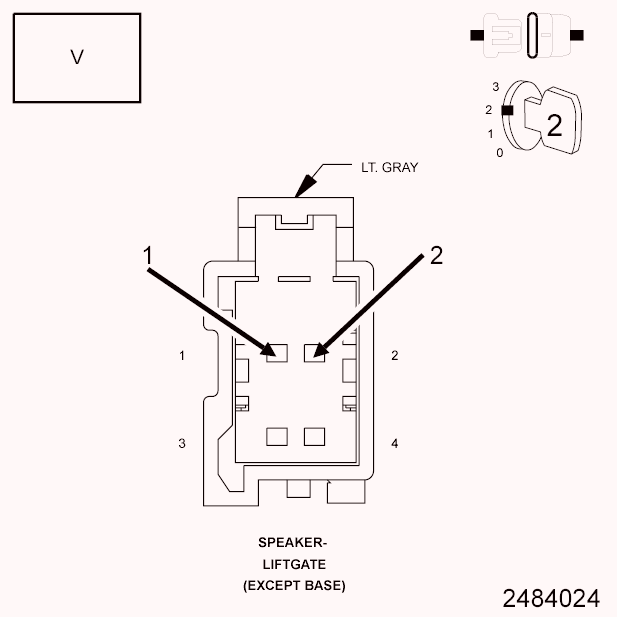
- CHECK THE OPERATION OF THE AMPLIFIED LIFTGATE SPEAKER Fig 1: Measuring Voltage Of Amplified Liftgate Speaker 1 Circuits In Amplified Liftgate Speaker Harness Connector
 Courtesy of CHRYSLER GROUP, LLC
- Turn the ignition off.
- Disconnect the Amplified Liftgate Speaker harness connector.
- Turn the ignition on.
- Turn the radio on and turn the volume to mid level.
- With a voltmeter set to read in A/C voltage, measure the voltage of the Amplified Liftgate Speaker 1 circuits in the Amplified Liftgate Speaker harness connector.
Is the voltage above 1 volt?
Yes
- Replace the Amplified Liftgate Speaker in accordance with the Service Information.
- Perform the BODY VERIFICATION TEST. Refer to STANDARD PROCEDURE - BODY VERIFICATION TEST .
No
- Go To 3
- CHECK THE (X214) AMPLIFIED LIFTGATE SPEAKER 1 (+) CIRCUIT FOR AN OPEN Fig 2: Measuring Resistance Of Amplified Liftgate Speaker 1 (+) Circuit Between Amplifier C2 Harness Connector & Amplified Liftgate Speaker Harness Connector
 Courtesy of CHRYSLER GROUP, LLC
- Turn the ignition off.
- Disconnect the Amplifier C2 harness connector.
- Measure the resistance of the (X214) Amplified Liftgate Speaker 1 (+) circuit between the Amplifier C2 harness connector and the Amplified Liftgate Speaker harness connector.
Is the resistance below 5.0 Ohms?
Yes
- Go To 4
No
- Repair the (X214) Amplified Liftgate Speaker 1 (+) circuit for an open.
- Perform the BODY VERIFICATION TEST. Refer to STANDARD PROCEDURE - BODY VERIFICATION TEST .
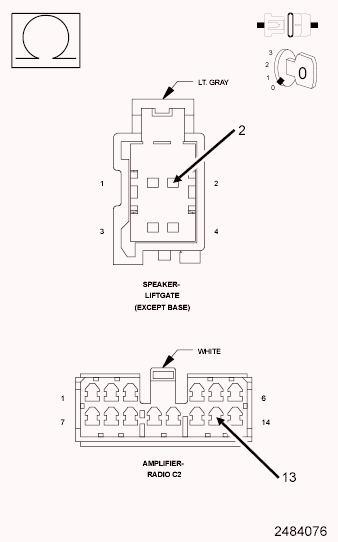
- CHECK THE (X284) AMPLIFIED LIFTGATE SPEAKER 1 (-) CIRCUIT FOR AN OPEN Fig 3: Measuring Resistance Of Amplified Liftgate Speaker 1 (-) Circuit Between Amplifier C2 harness connector & Amplified Liftgate Speaker Harness Connector
 Courtesy of CHRYSLER GROUP, LLC
- Measure the resistance of the (X284) Amplified Liftgate Speaker 1 (-) circuit between the Amplifier C2 harness connector and the Amplified Liftgate Speaker harness connector.
Is the resistance below 5.0 Ohms?
Yes
- Replace the Amplifier in accordance with the Service Information.
- Perform the BODY VERIFICATION TEST. Refer to STANDARD PROCEDURE - BODY VERIFICATION TEST .
No
- Repair the (X284) Amplified Liftgate Speaker 1 (-) circuit for an open.
- Perform the BODY VERIFICATION TEST. Refer to STANDARD PROCEDURE - BODY VERIFICATION TEST .
- Measure the resistance of the (X284) Amplified Liftgate Speaker 1 (-) circuit between the Amplifier C2 harness connector and the Amplified Liftgate Speaker harness connector.