Diagnostic Test
- CHECK FOR AN INTERMITTENT CONDITION
- Turn the ignition on and open one of the front doors.NOTE:
A front door must remain open whenever checking or erasing Amplifier DTCs.
- Using the scan tool, record and erase the Amplifier DTCs.
- Cycle the ignition switch from on to off, wait five seconds and then back to on.
- Turn the Radio on and set the volume to 25.
- Adjust the speakers to the rear and center.
- Using the scan tool, read the active Amplifier DTCs.
Does the scan tool display: B1486-CHANNEL 8 AUDIO SPEAKER OUTPUT CIRCUIT OPEN?
Yes
- Go To 2
No
- The condition that caused this symptom is currently not present. Check for an intermittent condition by inspecting the related wiring harness for chafed, pierced, pinched, and partially broken wires. Also, inspect the related connectors for broken, bent, pushed out, spread, corroded, or contaminated terminals. Repair as necessary.
- Perform the BODY VERIFICATION TEST. Refer to STANDARD PROCEDURE - BODY VERIFICATION TEST .
- Turn the ignition on and open one of the front doors.
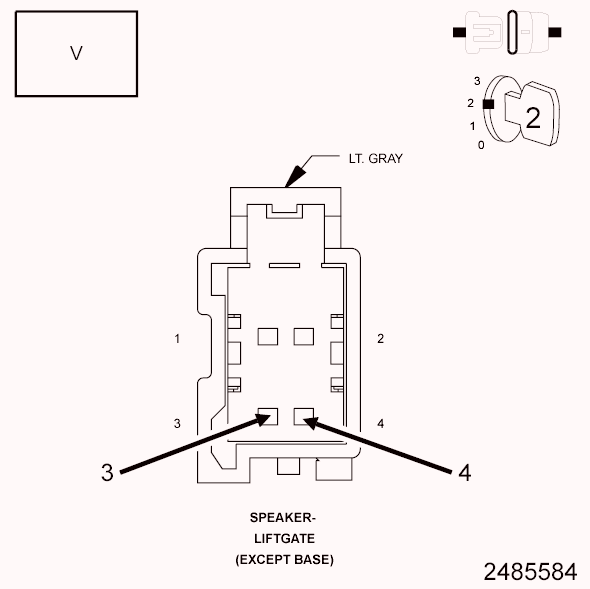
- CHECK THE OPERATION OF THE AMPLIFIED LIFTGATE SPEAKER Fig 1: Measuring Voltage Of Amplified Liftgate Speaker 2 Circuits In Amplified Liftgate Speaker Harness Connector
 Courtesy of CHRYSLER GROUP, LLC
- Turn the ignition off.
- Disconnect the Amplified Liftgate Speaker harness connector.
- Turn the ignition on.
- Turn the radio on and turn the volume to mid level.
- With a voltmeter set to read in A/C voltage, measure the voltage of the Amplified Liftgate Speaker 2 circuits in the Amplified Liftgate Speaker harness connector.
Is the voltage above 1 volt?
Yes
- Replace the Amplified Liftgate Speaker in accordance with the Service Information.
- Perform the BODY VERIFICATION TEST. Refer to STANDARD PROCEDURE - BODY VERIFICATION TEST .
No
- Go To 3
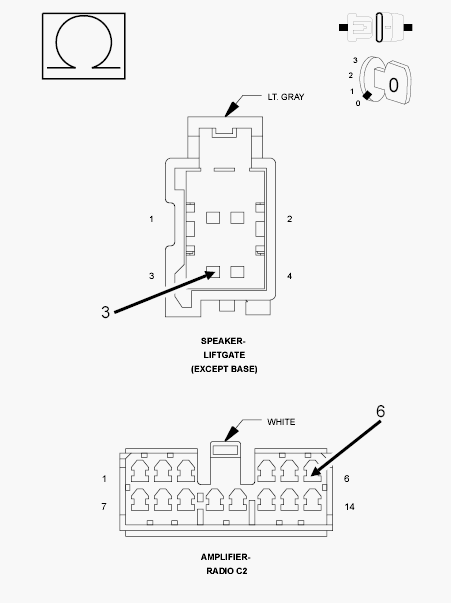
- CHECK THE (X212) AMPLIFIED LIFTGATE SPEAKER 2 (+) CIRCUIT FOR AN OPEN Fig 2: Measuring Resistance Of Amplified Liftgate 2 (+) Circuit Between Amplifier C2 Harness Connector & Amplified Liftgate Speaker Harness Connector
 Courtesy of CHRYSLER GROUP, LLC
- Turn the ignition off.
- Disconnect the Amplifier C2 harness connector.
- Measure the resistance of the (X212) Amplified Liftgate 2 (+) circuit between the Amplifier C2 harness connector and the Amplified Liftgate Speaker harness connector.
Is the resistance below 5.0 Ohms?
Yes
- Go To 4
No
- Repair the (X212) Amplified Liftgate 2 (+) circuit for an open.
- Perform the BODY VERIFICATION TEST. Refer to STANDARD PROCEDURE - BODY VERIFICATION TEST .
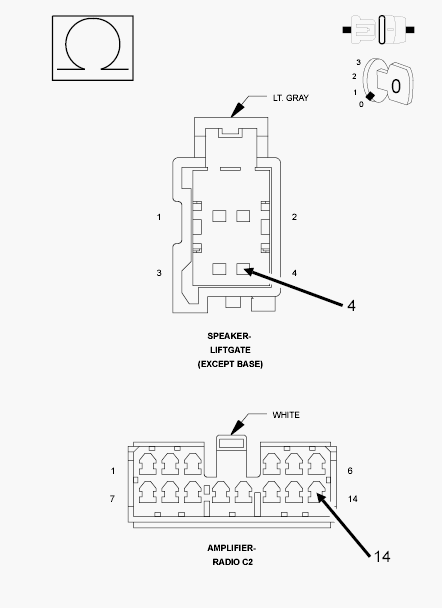
- CHECK THE (X282) AMPLIFIED LIFTGATE 2 (-) CIRCUIT FOR AN OPEN Fig 3: Measuring Resistance Of Amplified Liftgate 2 (-) Circuit Between Amplifier C2 Harness Connector & Amplified Liftgate Speaker Harness Connector
 Courtesy of CHRYSLER GROUP, LLC
- Measure the resistance of the (X282) Amplified Liftgate 2 (-) circuit between the Amplifier C2 harness connector and the (X282) Amplified Liftgate Speaker harness connector.
Is the resistance below 5.0 Ohms?
Yes
- Replace the Amplifier in accordance with the Service Information.
- Perform the BODY VERIFICATION TEST. Refer to STANDARD PROCEDURE - BODY VERIFICATION TEST .
No
- Repair the (X282) Amplified Liftgate 2 (-) circuit for an open.
- Perform the BODY VERIFICATION TEST. Refer to STANDARD PROCEDURE - BODY VERIFICATION TEST .
- Measure the resistance of the (X282) Amplified Liftgate 2 (-) circuit between the Amplifier C2 harness connector and the (X282) Amplified Liftgate Speaker harness connector.