Body - Interior & Exterior: Interior: Headliner: Installation: Installation

NOTE:
In the event the headliner is damaged or creased during removal, it will need to be replaced with a new headliner.
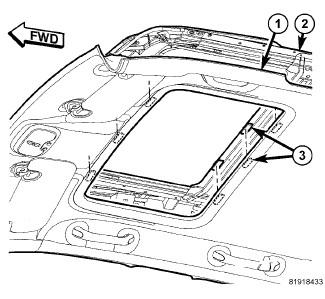
- Position the headliner into the vehicle and connect the washer hose at the front (1).
- Tuck the headliner up over the remaining interior trim and connect the rear washer hose, if equipped.
- Connect the dome light (1) electrical connector and position the headliner (4) up onto the rear header (2).
- Install the push pin fasteners (3).
- If equipped with a sunroof seat the trim ring fasteners (3) fully.
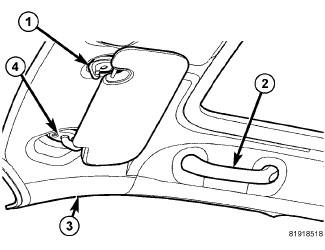
- Install the assist handles (2) and seat the retaining clips fully.
- Install the visors (4) and supports (1) and install the screws.
- Install the C-pillar trim (1). Refer to PANEL, C-PILLAR TRIM, INSTALLATION .
- Install the upper B-pillar trim (1). Refer to PANEL, B-PILLAR TRIM, UPPER, INSTALLATION .
- Return the seats into the upright positions.
- Press the headrest sleeve release buttons and install the headrest.
- Connect the rear view mirror (3) electrical connectors (1 and 2).
- Position the wire harness onto the A-pillar (2) and seat the push pin retainers (1) fully.
- Connect the electrical connector (3).
- Position the bottom A-pillar tab into the top cover (1) and seat the retaining clips (2) fully.