Switch, Horn: Installation: Installation
WARNING:
To avoid serious or fatal injury on vehicles equipped with airbags, disable the Supplemental Restraint System (SRS) before attempting any steering wheel, steering column, airbag, seat belt tensioner, impact sensor or instrument panel component diagnosis or service. Refer to WARNING . Disconnect and isolate the battery negative (ground) cable, then wait two minutes for the system capacitor to discharge before performing further diagnosis or service. This is the only sure way to disable the SRS. Failure to take the proper precautions could result in accidental airbag deployment.
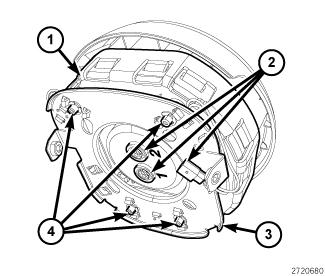
Fig 1: Driver Side Airbag Assembly, Electrical Connectors, Four E-Clip Retainers & Airbag Mounting Bracket
 Courtesy of CHRYSLER GROUP, LLC
- Position the floating horn switch and mounting plate unit (3) to the Driver AirBag (DAB) housing (1).
- Tighten the four captive screws (4) that secure the switch and mounting plate to the DAB housing. Tighten the screws securely.
- Position the DAB and floating horn switch unit close enough to the steering wheel to reconnect the electrical connections (2) at the back of the airbag housing.
- Reconnect the steering wheel wire harness connector to the floating horn switch connector on the back of the switch.
- Reconnect the wire connectors to the airbag inflator connector receptacles by pressing straight in on the connector insulator. Be certain to engage each keyed and color-coded connector to the matching connector receptacle. You can be certain that each connector is fully engaged in its receptacle by listening carefully for a distinct, audible click as the connector latches snap into place.
- Push each of the Connector Position Assurance (CPA) locks firmly into the DAB connector insulator until it is flush with the upper surface of the insulator.
- Reinstall the DAB into the steering wheel. Refer to AIR BAG, DRIVER, INSTALLATION .