Windshield Preparation - Installing A New Windshield

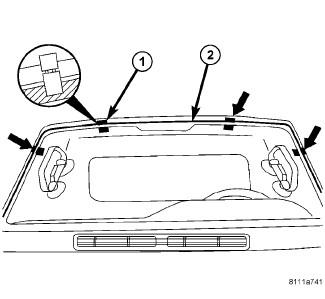
- Install the upper spacers (1) onto the upper edge of the glass (2).
- Apply four new spacers (2) to the A-pillars and place them evenly apart at the top and bottom.
- Install the lower spacer assemblies (1) into the slotted holes and verify proper installation by pulling to make sure they are locked on.NOTE:
Lower spacers must be facing with the flat side upwards when installing into the slotted holes.
- Position windshield (2) in center of windshield opening and resting on the side and lower spacers (2 AND 3).
- Adjust the lower spacers (3) as required, to obtain the specified roof gap tolerance by pushing on the side of the wedge and raising or lowering the glass as necessary. For roof gap specifications, refer to the table below Roof Gap Tolerances.ROOF GAP TOLERANCES
Roof Gap Roof Flush 4.0 mm ± 1.5 mm
Parallel within 2.0 mmUnderflush
2.0 mm ± 1.5 mm(0.16 in ± 0.060 in)
Parallel within (0.080 in)(0.080 in ± 0.060 in) 1 - TAPE 2 - WINDSHIELD FRAME - Clean and check windshield for damage.
- Position windshield in center of windshield opening.
- Apply adhesive tape to the locations shown in illustration to aid with final installation.
- Verify windshield gap is parallel to with windshield.
- Cut tape with a sharp knife and remove windshield.
1 - PRIMER 2 - WINDSHIELD SEAL - Clean and dry area of glass to be glued with a suitable glass preparation solvent and rag.
- Apply primer to gluing surface at windshield seal.
- Apply primer (1) around the perimeter of the glass to a width of 15 mm (0.5 in.) (2).
- Allow primer to air dry for at least 10 minutes.
- Using a flash light, verify that glass primer is without damage.